Monday, January 16, 2012

Needs a jacket. (Motoko Kusanagi Custom)


Okay, finished the new chest for my Motoko Microlady custom.

Yeah, I think I'm calling this done for now.


Wednesday, January 11, 2012

Jellybeans


I have a fondness for clear toys, and I just had to do this. 

Once the Iron Man figures went on sale I really had little I wanted to get from the line but this particular figure intrigued me. Once I got all of the paint apps on Inferno Armor Iron Man off (albeit getting some nasty chemical burns on my hands... dohohoho puns. (I think))  he looked pretty cool.


Even made a makeshift light stand for him, just so I could stare at his translucency all day.


A friend of mine suggested painting the head chrome for a sort of Henshin Cyborg/ Microman sort of look. 
I liked that idea but settled on just painting the faceplate, which isn't too bad as well.


In hindsight though I should have masked over the eyes. 

Thursday, January 5, 2012

Well she's done.


For the meantime at least, though some things I might fix here and there

EDIT: working on a reshaped chest to use on her.

. More pics up soon.

WIPS:


Tuesday, January 3, 2012

S.I.C.Kuuga Modification part 1 (Elbows)

New mod for the new year.

The goal of this tutorial is to replace the normal ball-joint elbow of the figure with a ball swiveljoint.Before we begin this modification let me briefly list down the components for this particular tutorial: pictured here is the upper and lower arms of Kuuga, and a 6mm revoljoint (but any brand would do, since ball swivel joint sets are also sold by other companies like Yellow Submarine or Hobbybase. If this is the case choose the joints that best matches the original color of the limb). Keep in mind that most joints of this design have a 3mm diameter peg.

Next are the tools, the main ones you'll need is a 1 to 1.5mm pin vise, a 3mm pin vise and optionally a hobby knife.

Then long nose pliers and optionally a side cutter


the first step is to use the long nose pliers to pry off the previous ball joint. Ideally the joint would come off in one piece but if the bond of the adhesive is too strong...


...The joint breaks off, leaving a large chunk stuck in the hole.


Here is where you might need to clean up the cut joint using a side cutter to trim off the excess plastic and a hobby knife to make sure the surface is flat.


Then next main step is to drill a guide hole in the middle of where the old joint was using the 1mm drillbit and then progressing to the 3mm bit for the main peg hole.


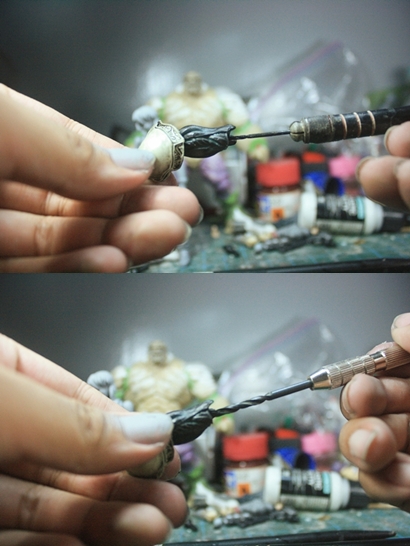
Repeat the process of the previous picture to the forearm, making sure to drill in the MIDDLE of the socket.

All that would be left is the assembly of the arm. Ideally you should drill deep enough to conceal the pegs of the ball-swivel joint.


This would be the result of the mod to the arms. Next time we'll deal with adding the same kind of articulation to the knees.
Stick around for part 2.

Sunday, January 1, 2012

First post for the new year, managed to get some stuff while on my short vacation:


Through sheer luck i was able to find this Yujin Briareos figure(same line from where I got Deunan), and now my Deunan has her husbando. Since the neck joint didn't really help keep the head in place I got rid of it and replaced it with a cut revoljoint. Also in the picture is the current status of my Motoko Kusanagi custom, which is almost finished in terms of sculpting (just the detail on the other boot now).

The other thing that I bought but not for myself is this:


Was quite surprised at finding this, the molding quality of the bootleg is remarkably good, the print of the instructions  is well done too.  Got this for a friend though who still hasn't bought  one, but wants it pretty bad. Makes me wonder if there's a Deathsaurer kit bootleg out there as well.